Feb 2020 - Part 1 – 3 Phase Approach to solving Moisture Intrusion in 10-unit building, Roscoe Village
Information below from WickRight General Contracting proposal February 2020
Overall we need to fix areas where there is obvious water intrusion AND create a way for the building to vent and dry itself out. Water intrusion typically shows itself locally, but in many instances water will run vertically or even horizontally before it shows itself. Our need is "triage" to address the more obvious and correctable matters.
We are suggesting a three-phase approach. Phase One will address active situations that are critical and more readily accessible than other issues. Phase Two will use information learned thru investigation to address additional issues. Phase Three will concentrate on masonry maintenance.
PHASE ONE areas include:
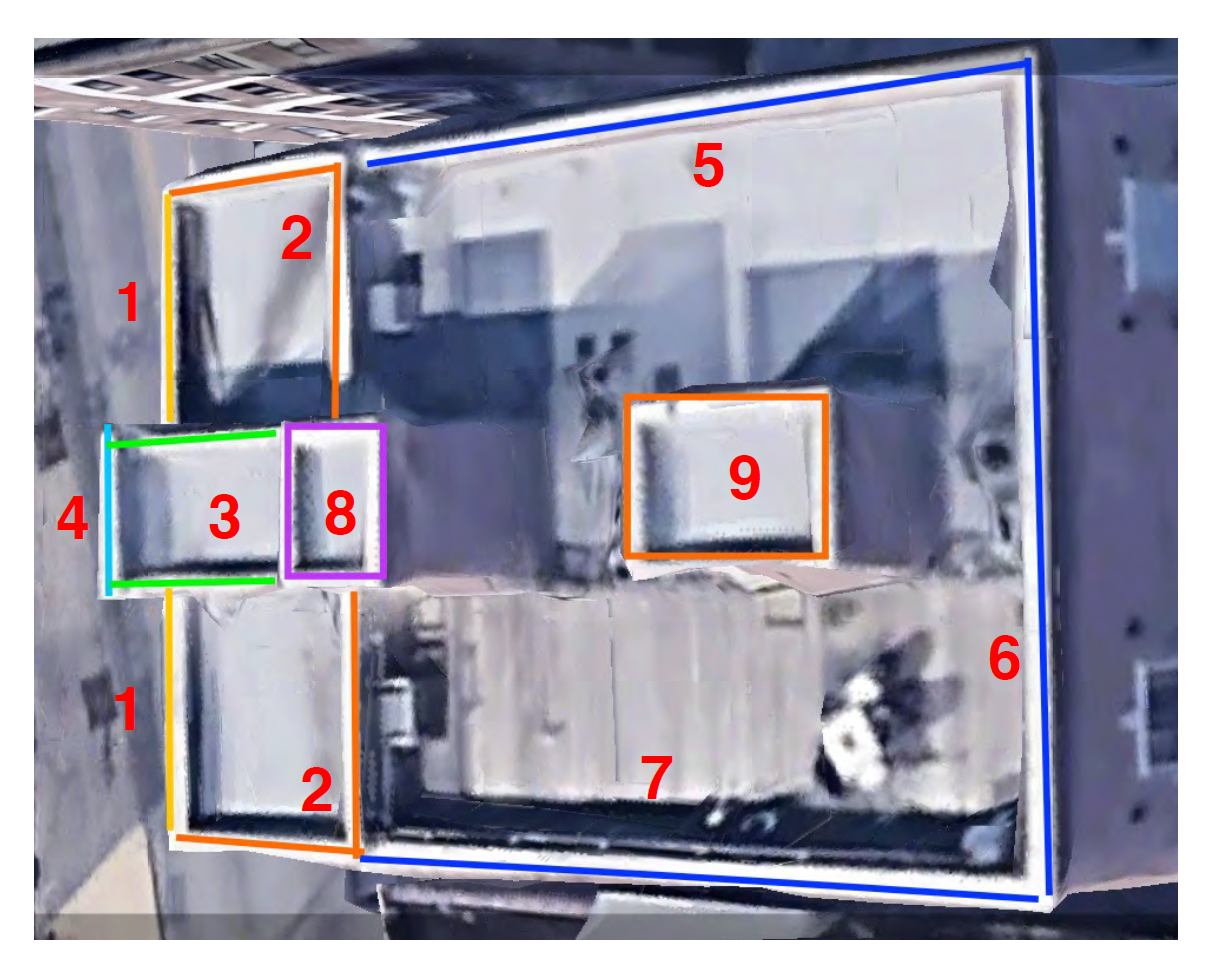
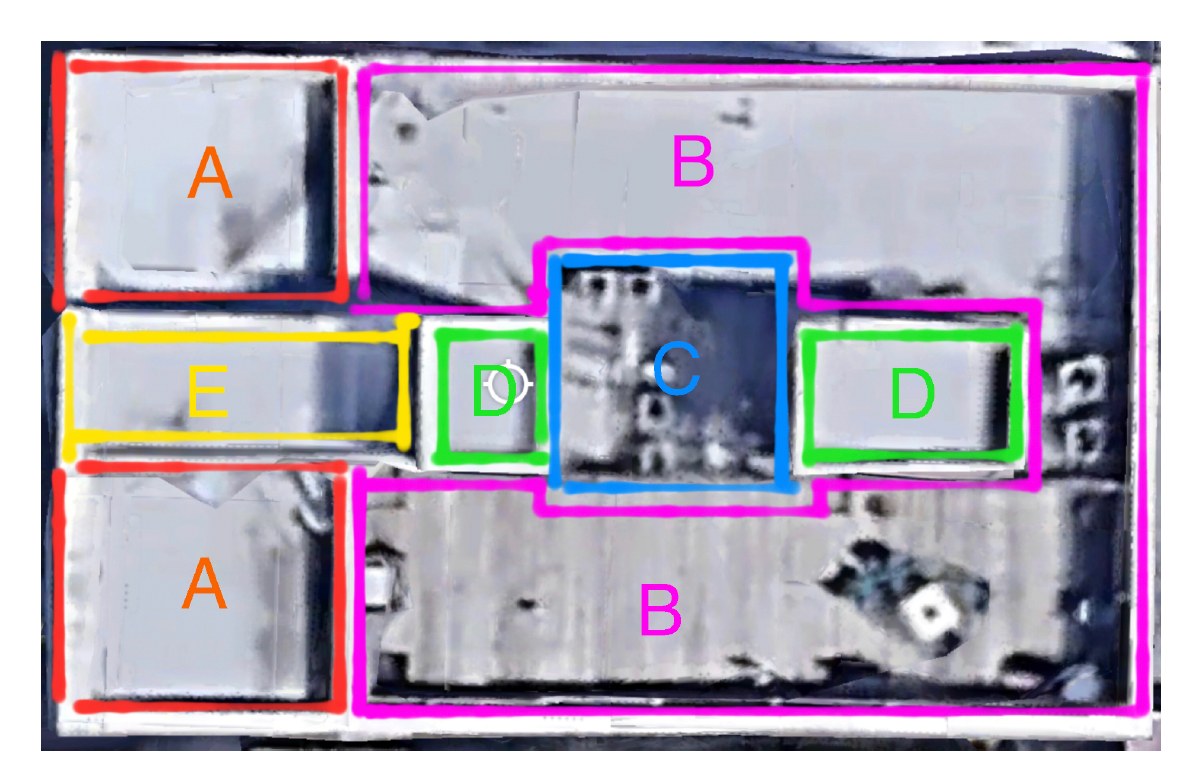
(A) Front Elevation and parapet walls venting and coping (capstone) –
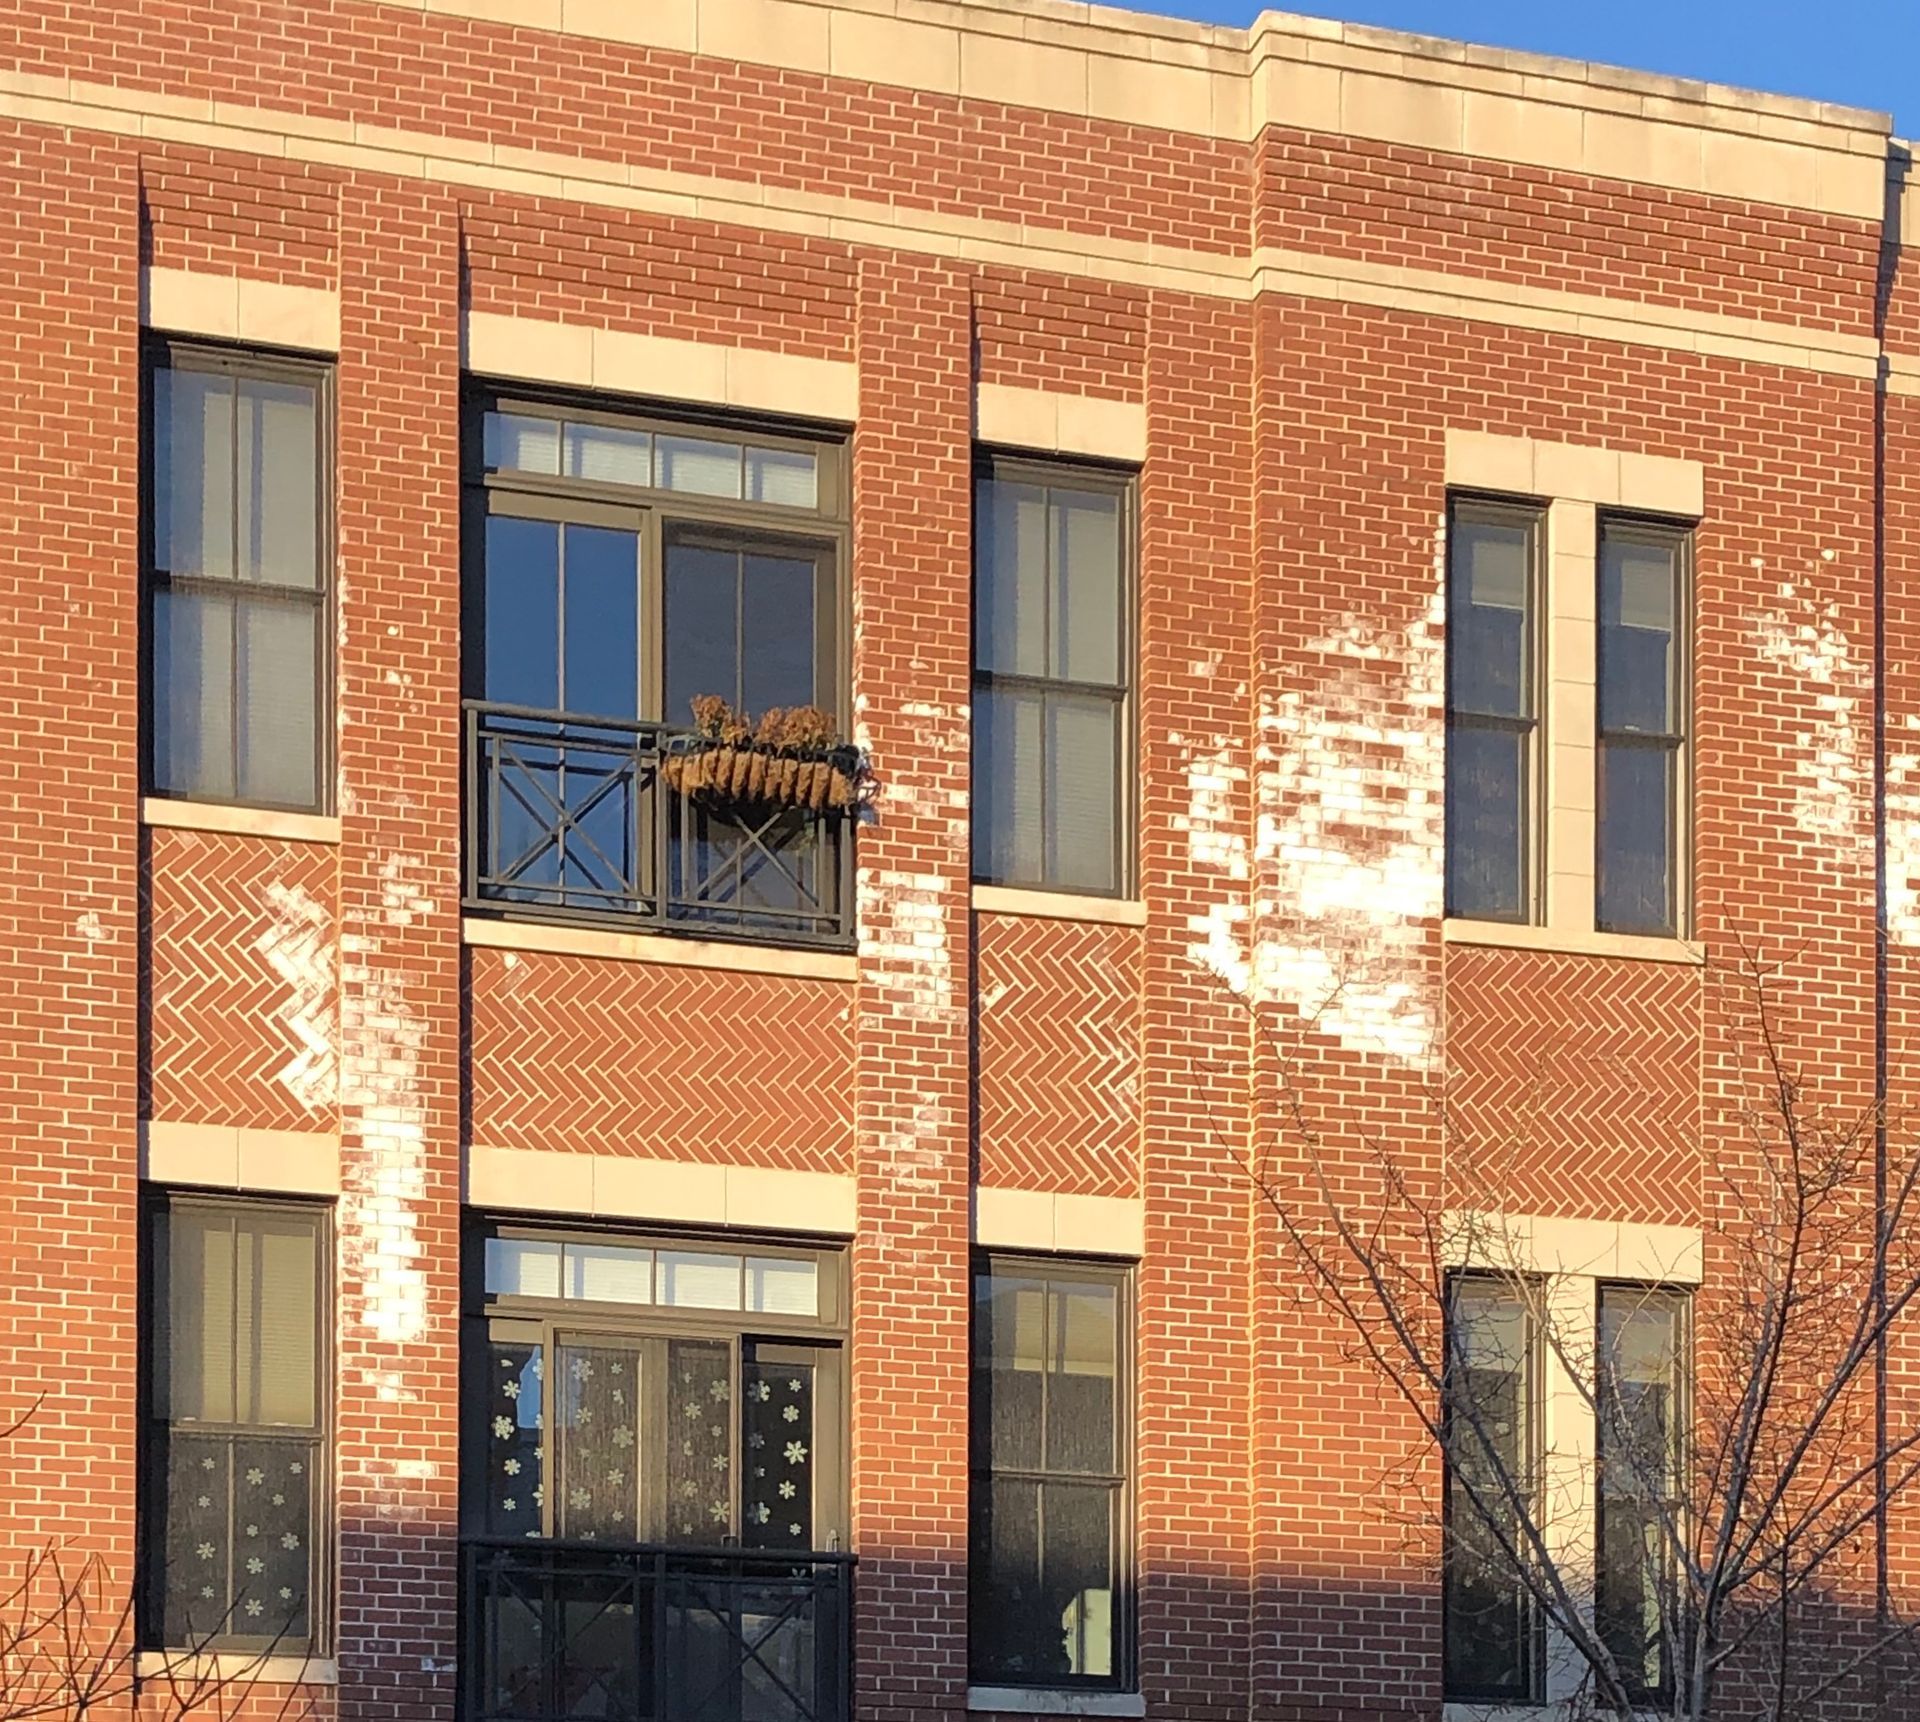
We know from the white staining on the front of the building that we have a significant issue. We need to understand the condition of the parapet and roof system at the front of the building behind the front parapet.
(B) Moisture and “settling” issues –
Based on experience, the working assumption is that these issues are actually arising from moisture intrusion via the doghouses and other intrusion points, including condensation in the roof “airspace” with the moisture migrating to other locations. These issues have probably impacted most units, but haven’t yet revealed themselves.
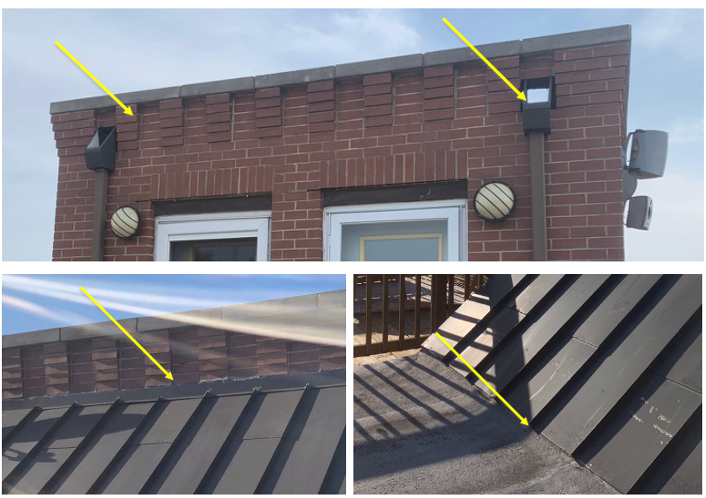
(C) Side wall parapets and demising walls on the roof –
The current metal coping legs (sides of the copings) are not long enough on the East and West walls and on some demising walls. This allows wind driven rain to enter under the leg and into the wall core. Unfortunately there is no way for that moisture to vent out/exit again.
PHASE ONE
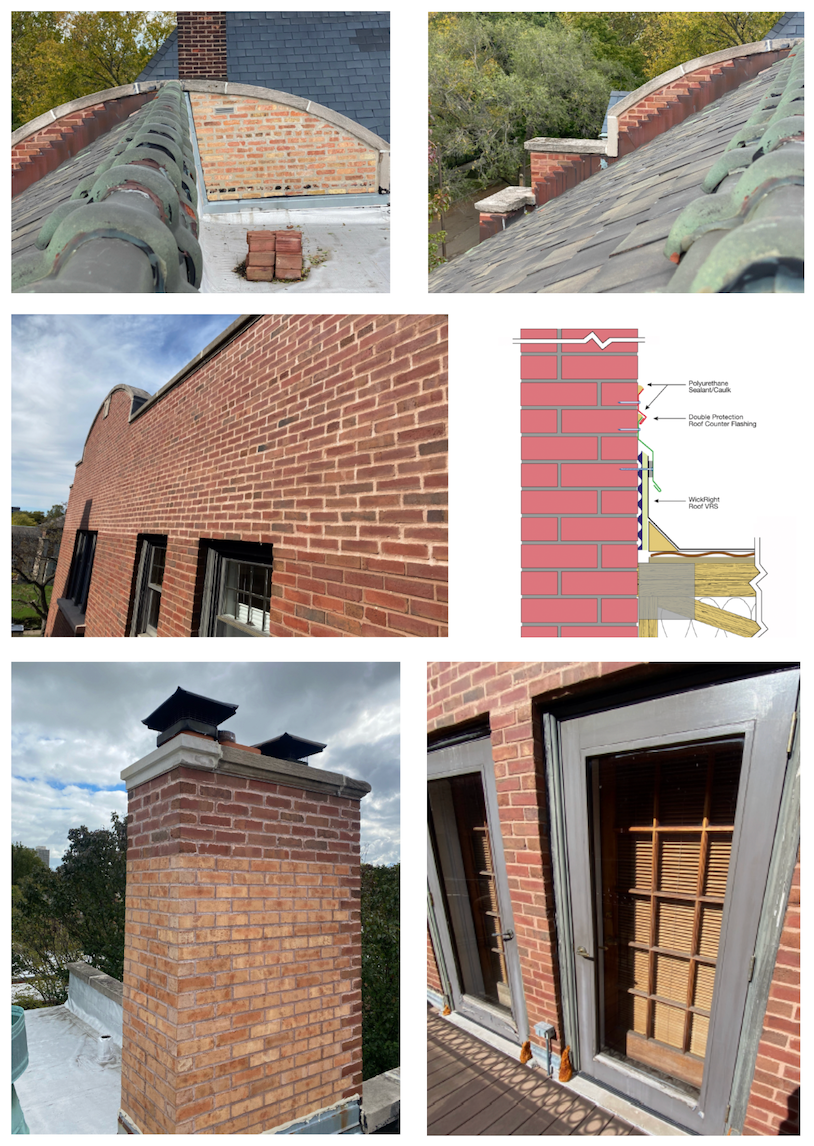
(1) Front elevation parapet - Cover stone cornice with custom designed vented sheet metal cornice - Click to read details on this step
The front parapet capstone assembly is a multi-tiered, porous man-made stone that extends above/higher than the adjoining roofline behind it.
A cost-effective approach to prevent water intrusion is to encase the entire top of the parapet, all the way down to the brick, in a metal sheathing or "cornice".
(2) Venting: Interior side of the front parapet – Proposed Repair:
Install ventilation and replace any damaged roof deck plywood sheathing. The roof has a "modified bitumen membrane" that covers the entire surface of the roof and that currently runs from the roof (flat part that you stand on), up and over the top of the front parapet and demising walls.
Our goal is to add ventilation and repair sections of the roof plywood sheathing during the ventilation installation process.
The front parapet and roof are accumulating moisture from at least two sources. First, the capstone on the front elevation of the parapet is absorbing water. Second, moisture is migrating toward the front of the building within roof system. There is more space between the roof deck and the ceiling below at the front of the building than at the rear of the building because the roof slopes from front to back for overall drainage to the gutter. This is proper construction for roof drainage to a gutter.
Net, net: there is water behind roof membrane and under the front section of the roof. Although blistering and wrinkling happens to roof membranes as they age, it can also indicate moisture damage to the underlying plywood and/or trusses. To be safe, we need to check the plywood and trusses. They are essential to the building’s structural integrity. Hopefully, nothing serious will be found.
We predict that this roofing repair will extend back toward the center of the roof, terminating at some point between the front wall and the bottom of the doghouse's slanting roof.
Window and Pilaster Investigation needed:
In order to find an economical repair, we will first have the ChemTrete technical rep perform a Rilem Test, to determine if the stone can be sealed properly or not. If the stone cannot be sealed successfully, a header and sill stone will be removed from a window opening. By investigating one window opening with two single windows and a middle stone pilaster (column of stone) we can document all construction details including the pilasters and the condition of the lintels. Please note: some brick surrounding the headers and sills will need to be removed during the inspection. Investigation includes fixing one set of windows from ladders
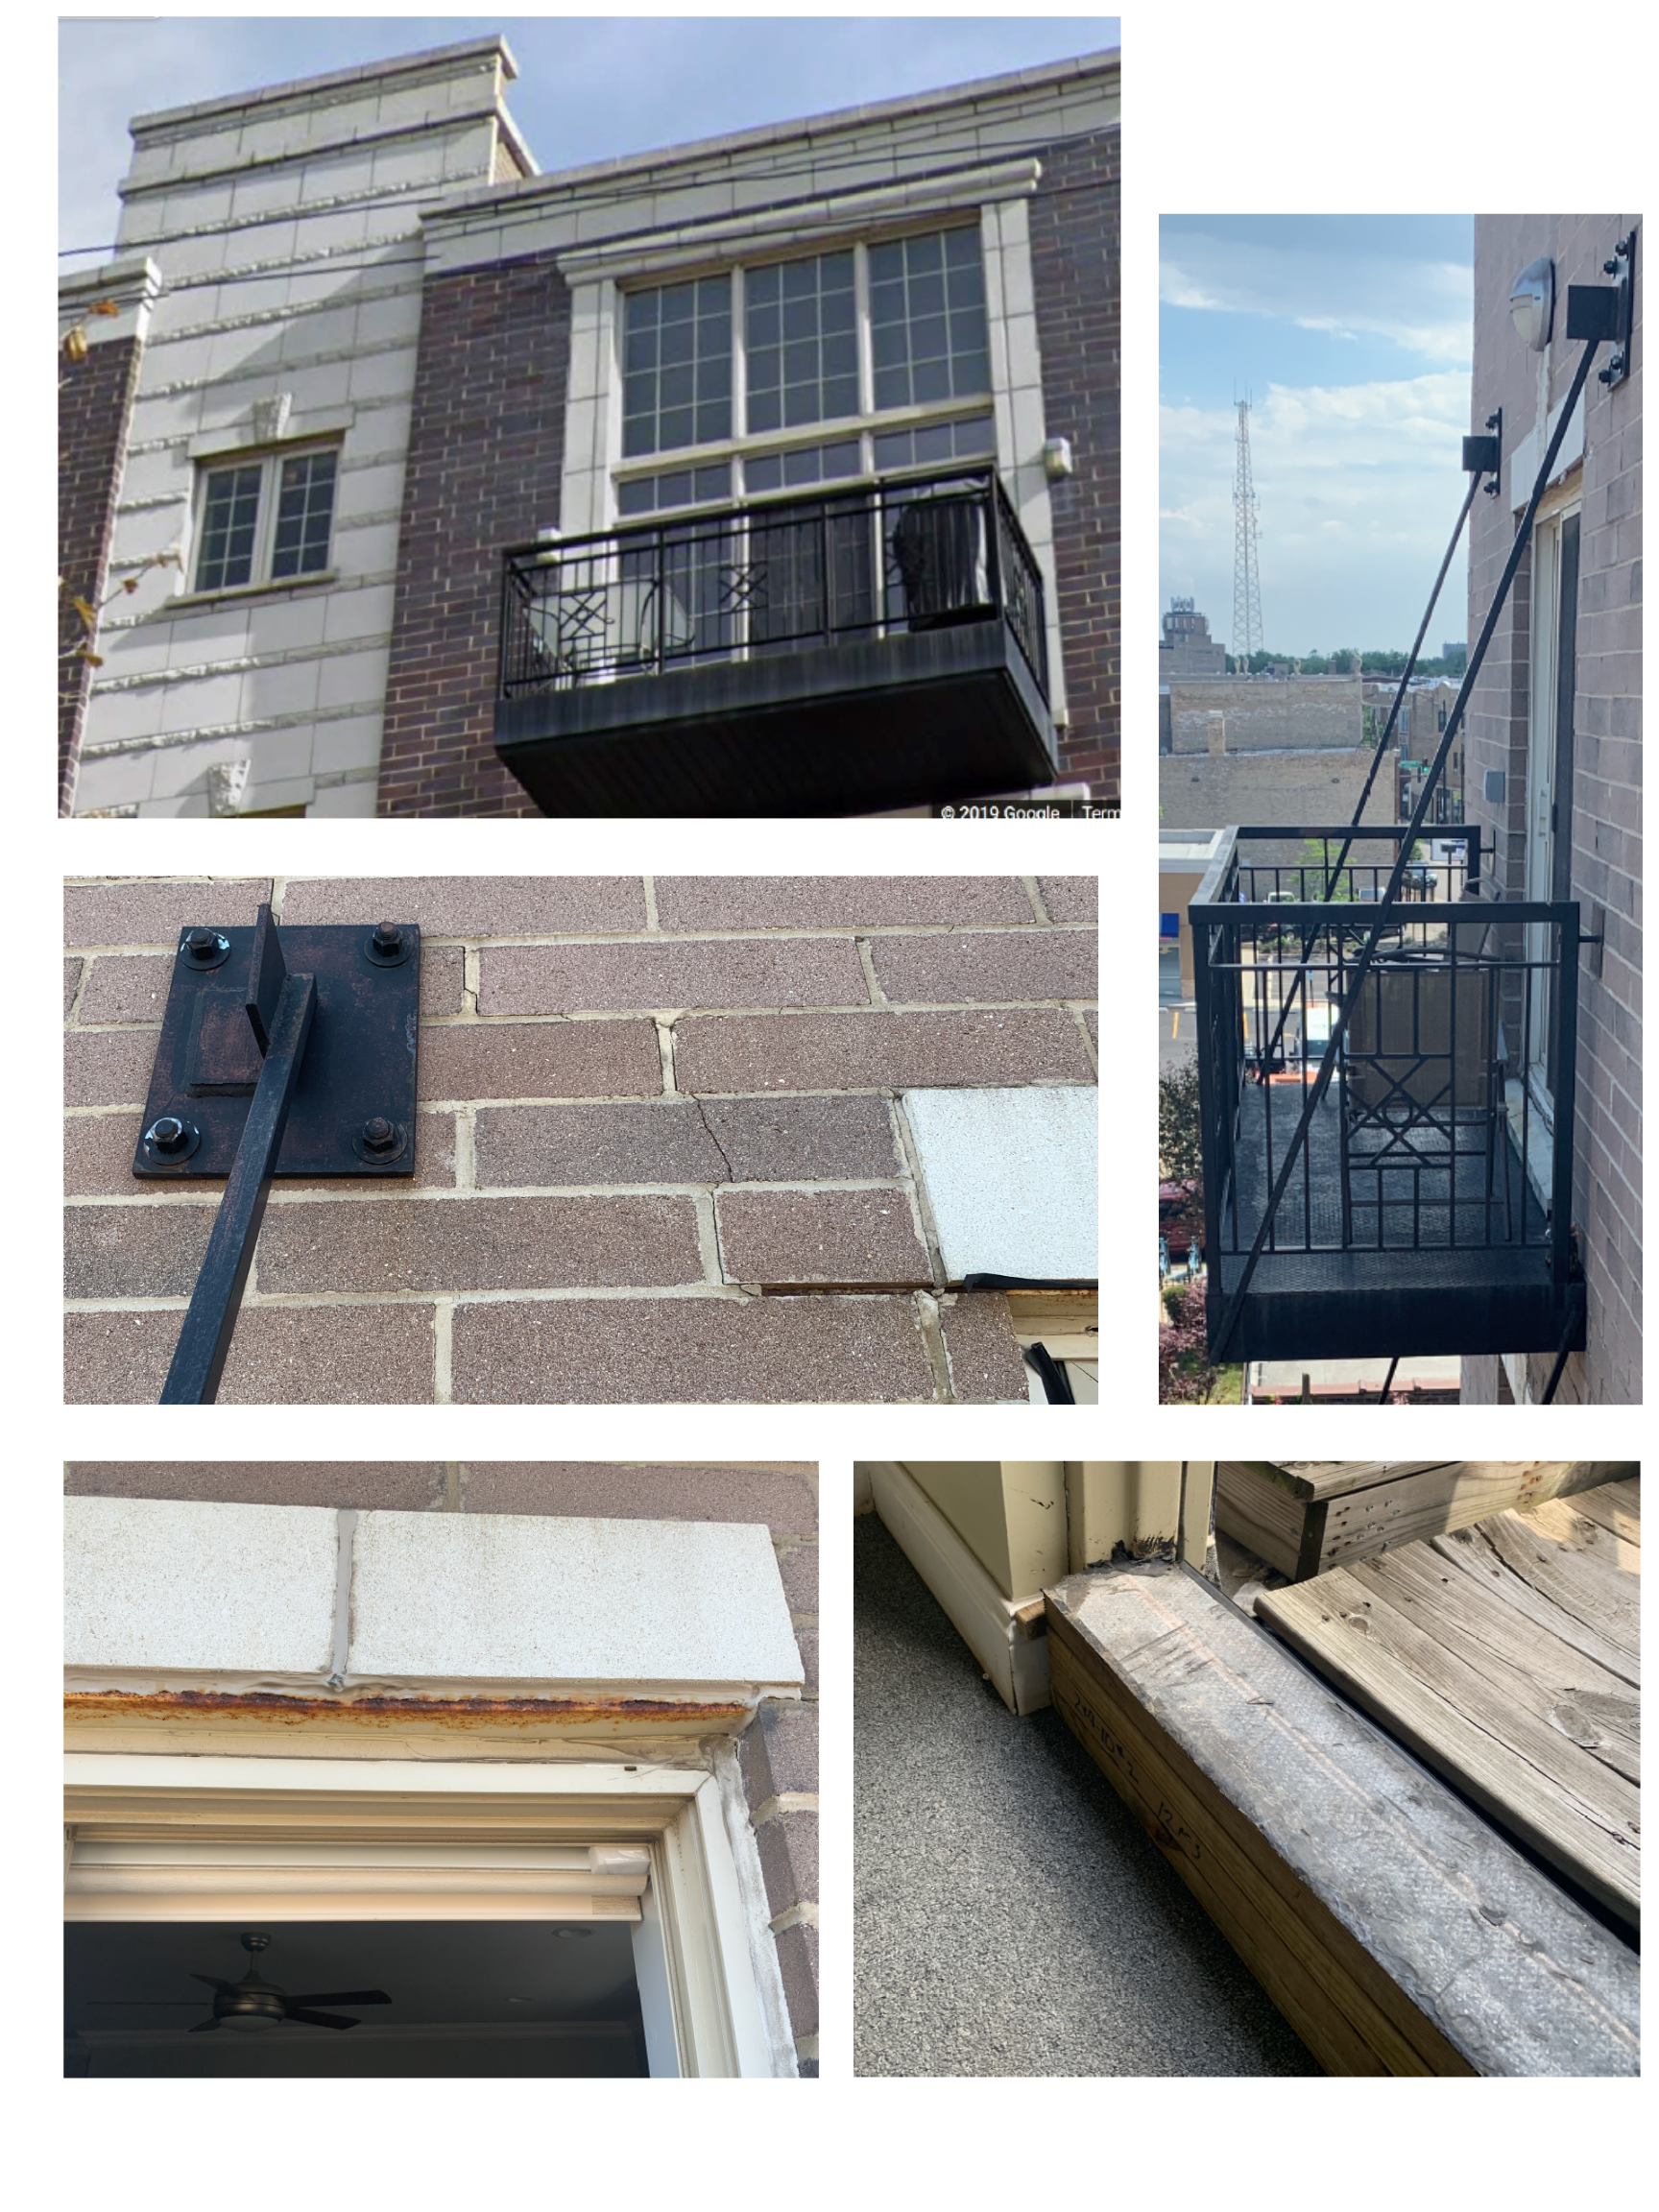
(3 ABC) Front Elevation - Stone at top, bottom of windows and doors – Situation:
We need to understand how the openings are constructed and how/if they are routing water behind the brick facade. The recessed construction style of the windows, flanked by the brick columns, can cause water to accumulate mid-way or migrate inward, rather than exit the window area. In addition, when setting the doors and windows during construction, “gaps” may have been covered over, that are not visible at this time.
Header Repair: Remove header stones, flash properly, re-install header stones. Juliette Balconies, Single Windows, 2 Window w/Pilasters
Sill Repair: Remove sills, install stainless steel pan flashing, self-adhered membrane and end dams to stop any water from moving sideways internally to the brick façade columns. Re-install sills in openings on plastic shims providing an air space under the sill to facilitate drying after each rain. Juliette Balconies, Single Windows, 2 Windows w/Stone Pilaster
***All window and pilaster repairs should be performed simultaneously. Mobilization, boom lift and permit costs will be duplicated if repairs are performed separately. Any scrapping and painting of lintels will be charged on a time and materials basis.
Doghouse Repairs –
"Doghouse" trade name for the Stairwell Building on the Roof that provides roof access from the interior of the building
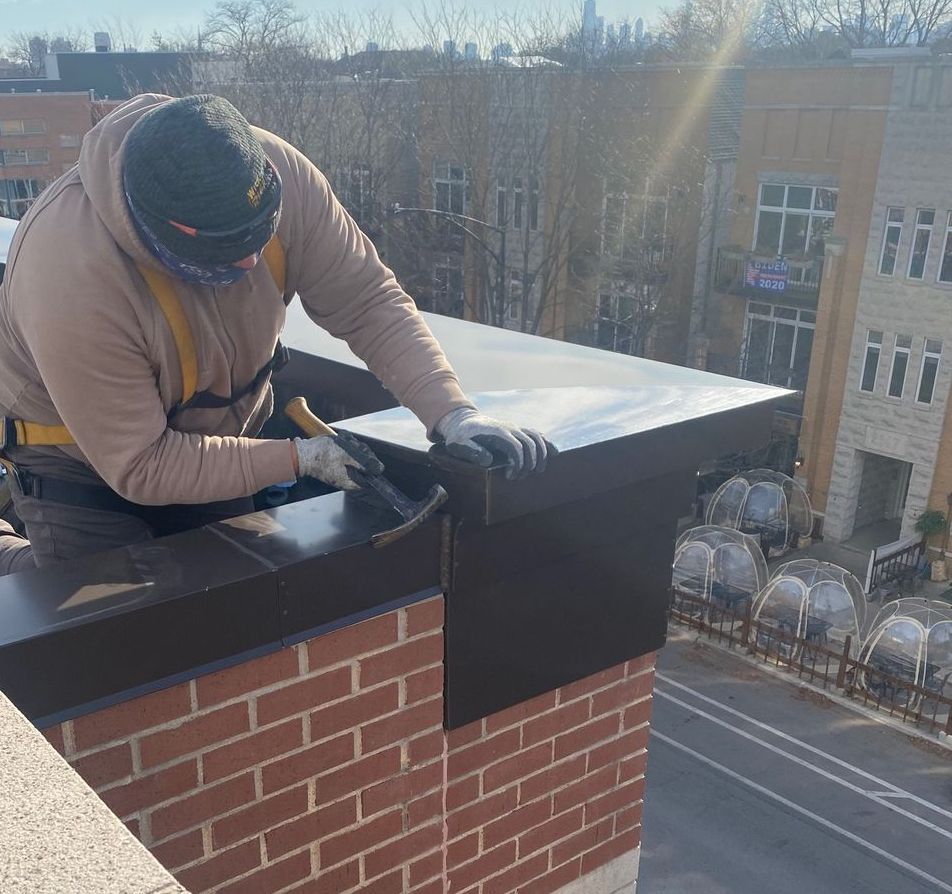
(4) Doghouse: Fix scupper (gutter/downspout assembly), roof/capstone and flashing
There are various options to address the construction of the doghouses that is likely allowing moisture into units and migrating to other locations within the building. The tops of your doghouses have Corbels (multi-level brick details that stick out every few feet). Behind the corbels there is a layer of brick and cinder block, just like the roof parapets, that are taking on moisture.
Our solution is to re-work the interior side of the capstone (the side you can’t see), expose the cinder block core and put a metal coping over the entire limestone capstone so there is no entry point for water. Metal copings are a cost-effective way to prevent water intrusion. We will also install ventilation to allow trapped moisture to evaporate and prevent condensation accumulation. This method will generally allow the exterior appearance to remain unchanged. In addition the doorways, lights, scuppers, etc. need to be sealed. The solution is a variation of the venting proposed for the front of the building. The metal coping will encapsulate the limestone capstone. Ventilation will be installed under the coping.
(5) Change current “standing seam” doghouse roofs to a modified bitumen roof connection
The slanting metal roofs that run from the back top of the doghouses to the main roof have to be completely removed to re-work the modified bitumen membrane underneath, especially at its termination juncture with the main roof.
During the replacement process, ventilation of the angled roof will be built into the structure. This is an important part of the process that will mitigate condensation in the roof cavities. When the new roof material is installed (either a less expensive metal than is currently there or a type of roof membrane), a removable starter "course" will be installed at least 14”-16” uphill from the base of the roof framing. Think of it as needing a way to both introduce air into the angled upper roof and allow air out of the lower roof.
Demising Wall Tests
Demising wall parapets are shared walls that protrude from a roof deck. A demising wall is a full height wall that provides a firebreak between structurally significant sections of the same building. Their parapets are typically buried under roofing materials, which causes condensation issues. Your roof has demising walls with roof membrane covering them or metal copings.
(6A) – Demising Wall Test:
Choose one side of a demising wall to install WickRight Roof Vent. Wall must have no mechanicals connected to or near the wall and no conduit running in or along the wall. This work should provide significant insight as to possible issues that may exist within the remaining roof and demising walls
(6B) Plan for venting the metal covered demising walls:
At a minimum, the existing metal coping legs pictured below are too short and new metal coping is needed. Moisture entering under these copings is likely the cause of leaks in the closets on the walls below.
We need to understand the roof’s framing and insulation assemblies -- how was it constructed, any hidden flaws or repair issues? We need to inspect the truss connection to the demising walls, the air space above insulation and the vapor path towards the front of the building. We hope to find this out when we open up the front portion of the roof to install ventilation, however, we may need to open random sections of the roof along demising walls to ensure all damage is repaired. Additional investigation may be prudent.
*PHASE ONE does NOT include any Roof Vent installation along interior or exterior walls near decks, as the space between the wall and the deck is too narrow. Installation would require removal of the deck. PHASE ONE also does NOT include any Truss Reinforcement or replacement, chipping of mortar from around trusses, or removal of insulation between trusses.
PHASE TWO – implement repairs based on Demising Wall Tests
IF 6A works well – HOA to consider installing WickRight Roof VRS on interiors of all perimeter parapet walls
IF 6B works well AND remaining demising walls still have moisture issues, HOA to consider installing WickRight Roof Vent
PHASE THREE - Masonry Maintenance
(7) Masonry Maintenance for the front of the building – this step should move to the top of section (3) if the header and sill stones can be successfully sealed with ChemTrete to take full advantage of the boom lift rental and City of Chicago street and sidewalk permits.
(8) Seal the five split block exterior sides (East, West, two center walls and the North rear elevations)
(9) Evaluate gutter, specifically the north end of the gutter